How to configure DHL Express Using Shipi DHL Express Integration plugin in wordpress
This guide explains every field and toggle in the Shipi DHL Express Integration plugin wizard for WordPress/WooCommerce, matching the steps and screens shown in the setup flow:
- Integration → 2) Global Settings → 3) Rates → 4) Shipping Label, Pickup, Tracking → 5) Shipi.
Navigation path: Wordpress → Settings → DHL Express Config
1) Integration → DHL Account Information
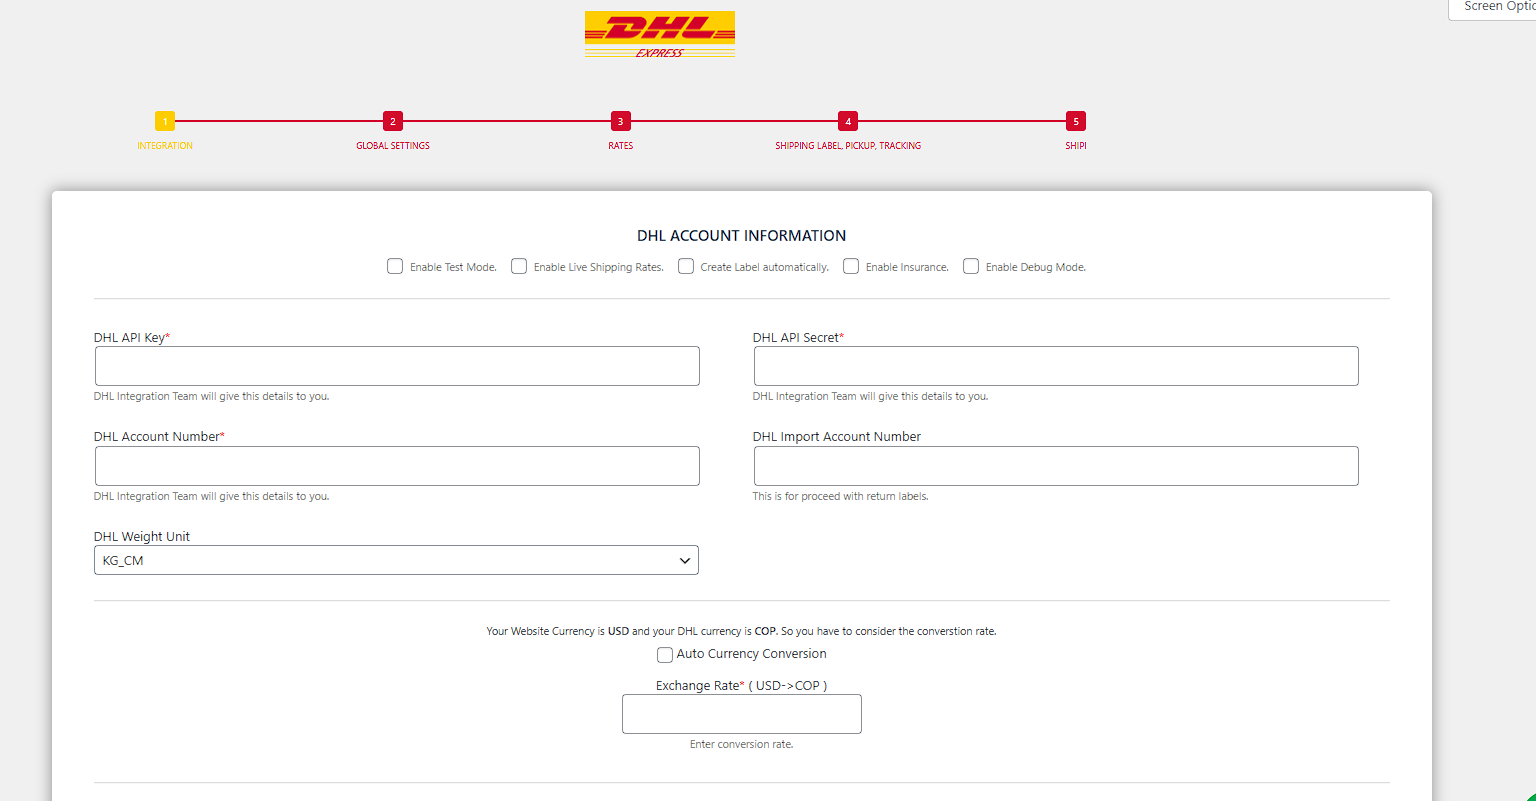
-
Enable Test Mode
Default: Off
Use DHL sandbox credentials. Keep off for production. -
Enable Live Shipping Rates
Default: On
When enabled, checkout uses real‑time DHL rates. Turn off to use manual rates or hide rates. -
Create Label automatically
Default: Off
When an order is placed (or paid), the plugin auto‑creates a DHL label using the defaults set under Shipping Label Automation (Step 4). If a required field is missing, label creation fails and the order note will include the error. -
Enable Insurance
Default: Off
Adds declared value/insurance where supported. Charges appear in the DHL rate if your account is enabled for insurance. -
Enable Debug Mode
Default: Off
Writes request/response logs for troubleshooting (plugin logs). Disable in production.
Credentials & Accounts - Document Link to Get Integration Details
-
DHL API Key (required)
Your REST/JSON key from DHL. Provided by DHL Integration team. -
DHL API Secret (required)
Secret that pairs with the API Key. -
DHL Account Number (required)
Your shipping (export) account used for rating, labels, and pickups. -
DHL Import Account Number (optional)
Used for return labels and import‑billed shipments. Leave empty if you do not create returns.
Units & Currency
-
DHL Weight Unit (required)
Options:KG_CMorLB_IN. Must match how you measure products. For mixed catalogs, choose the unit you maintain in WooCommerce and let the plugin convert. -
Auto Currency Conversion
If your store currency and DHL account billing currency differ, enable this to let Shipi convert automatically. If off, you must enter a fixed rate. -
Exchange Rate (Store → DHL)
Visible when Auto Conversion is off. Enter a number like1 USD → 4050 COP = 4050. Used to convert returned DHL prices into the store currency (or vice‑versa, depending on your configuration note shown on the screen).
Tip: The notice on screen clearly states “Your Website Currency is X and your DHL currency is Y”. Use that as the direction for the Exchange Rate you enter.
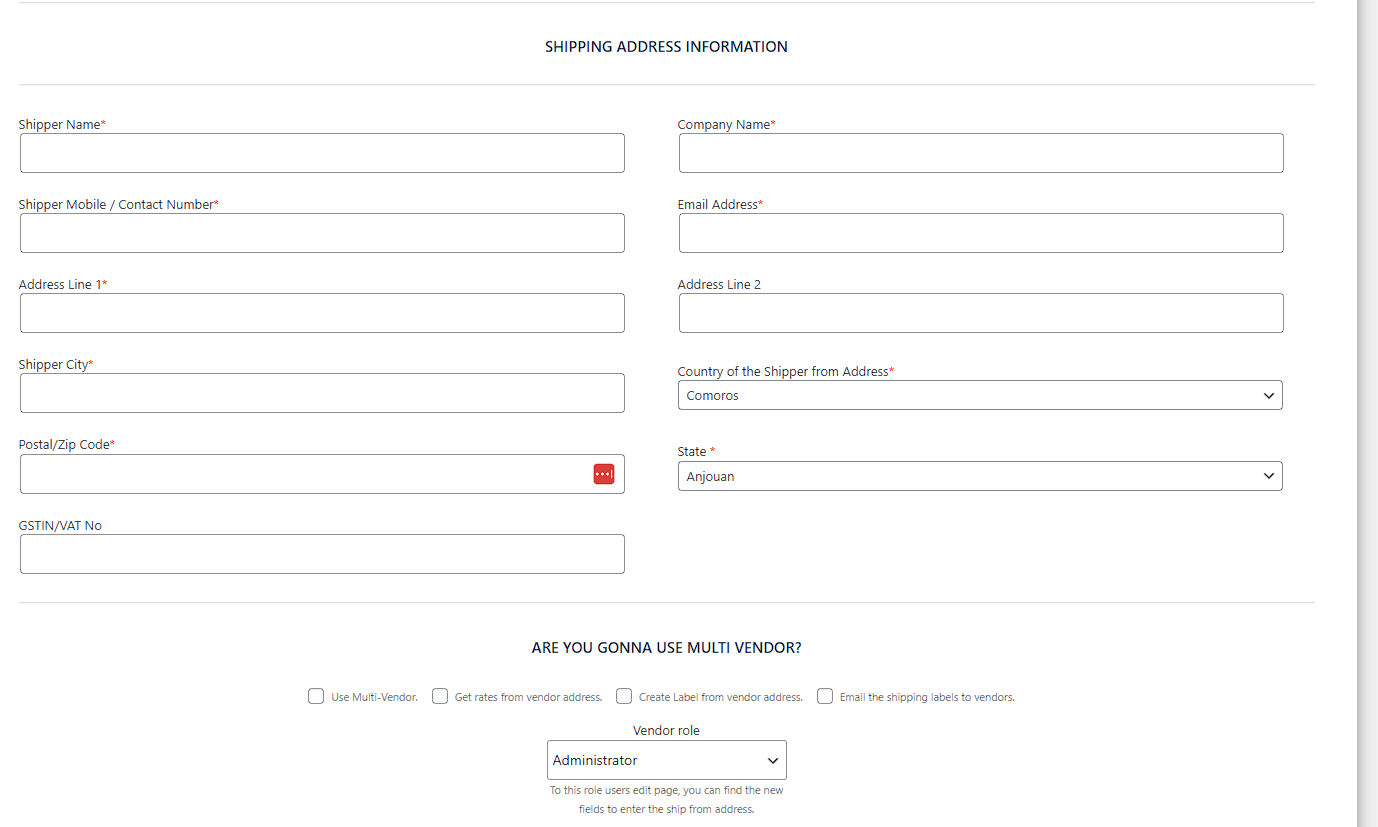
1) Integration → Shipping Address Information (Shipper)
These fields define your ship‑from address used for rates, labels, and pickups.
-
Shipper Name*
Contact person’s full name. -
Company Name*
Legal/brand name printed on labels & invoices. -
Shipper Mobile / Contact Number*
Number reachable by DHL courier. -
Email Address*
Used for label/invoice notifications and pickup confirmation (if configured). -
Address Line 1* / Address Line 2
Street address. Keep Line 1 under DHL length limits; use Line 2 for suite/floor. -
Shipper City*, State*, Postal/Zip Code*
Must match DHL’s addressing format for your country. -
Country of the Shipper from Address*
The origin country. -
GSTIN/VAT No
Optional tax number printed on commercial invoices where applicable.
Multi‑Vendor Options (optional)
For marketplaces where vendors ship their own orders.
-
Use Multi‑Vendor
Enables vendor‑origin workflows. -
Get rates from vendor address
At checkout, rates are calculated from the vendor’s ship‑from address (per vendor) instead of the store address. -
Create Label from vendor address
Labels use the vendor’s ship‑from by default. -
Email the shipping labels to vendors
When a label is created, a copy is emailed to the vendor. -
Vendor role
Pick the WordPress role that represents vendors (e.g., Vendor, Shop Manager, Administrator for testing). Users with this role get access to a vendor ship‑from address form.
Note: When vendor options are enabled, ensure each vendor profile has a complete ship‑from address; otherwise rate/label creation can fail.
2) Global Settings\
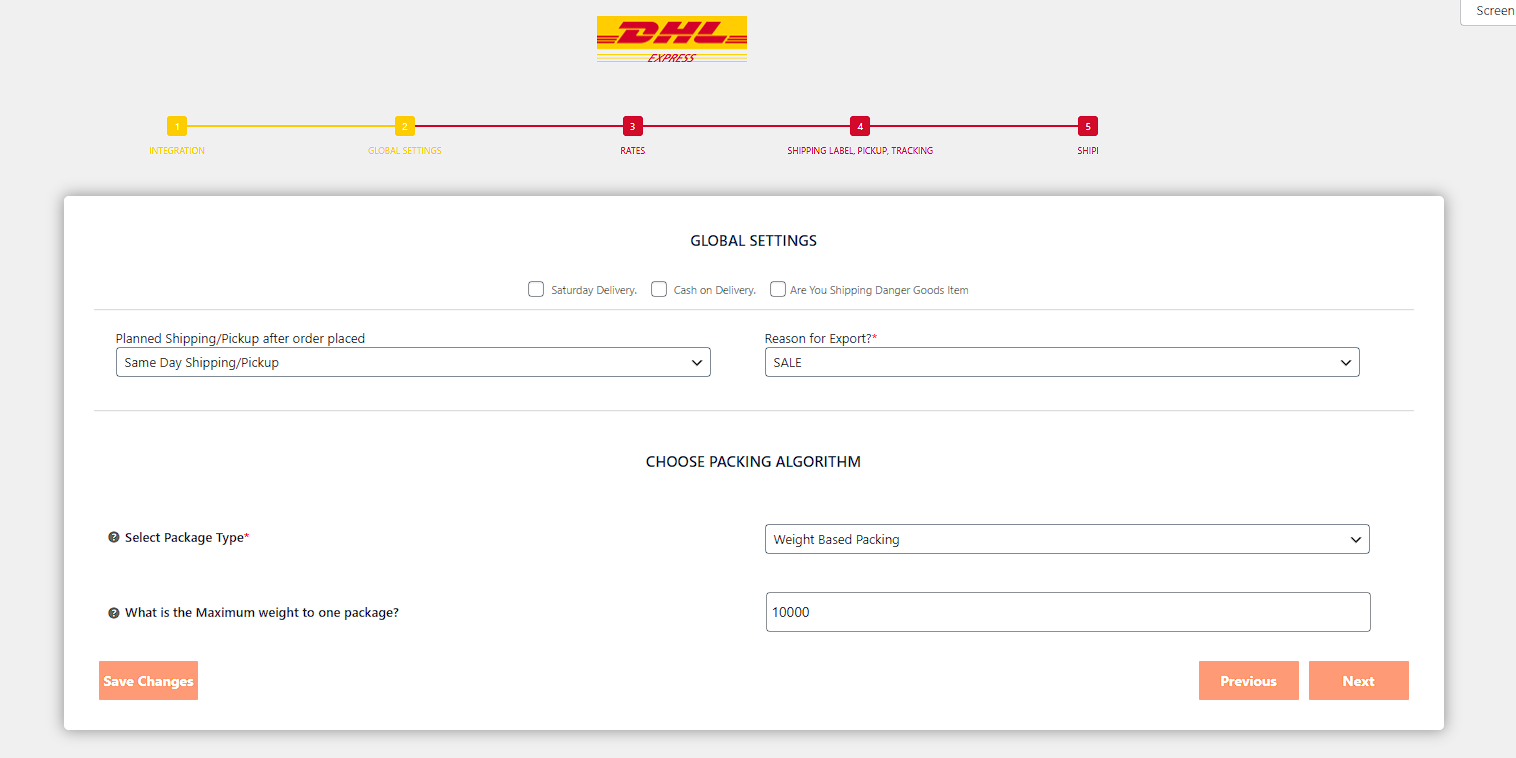
-
Planned Shipping/Pickup after order placed
When you generally hand parcels to DHL. Options include Same Day Shipping/Pickup, Next Business Day, etc. Used as a default for pickup scheduling. -
Saturday Delivery
Request Saturday delivery where supported by origin/destination. -
Cash on Delivery
Marks shipments as COD where supported (ensure your DHL contract has COD service). -
Are You Shipping Dangerous Goods Item
Enables DG flags for compatible products/shipments when applicable and allowed on your account. -
Reason for Export*
Purpose used on customs documentation (e.g., SALE, SAMPLE, RETURN, GIFT). Choose the one that matches your typical exports. You can override per‑label later if needed.
Choose Packing Algorithm
Controls how items become packages when creating labels.
-
Select Package Type* (dropdown)
-
Box Packing – Packs items into one or more predefined boxes using dimensions/weights.
-
Pack Items Individually – Each item becomes its own package.
-
Weight Based Packing – Splits into packages by weight threshold only (ignores dimensions).
-
-
What is the Maximum weight to one package?
Used by Weight Based Packing to cap each package’s weight (e.g.,10000 g= 10 kg).
Box Packing Configuration (visible when Box Packing is selected)\
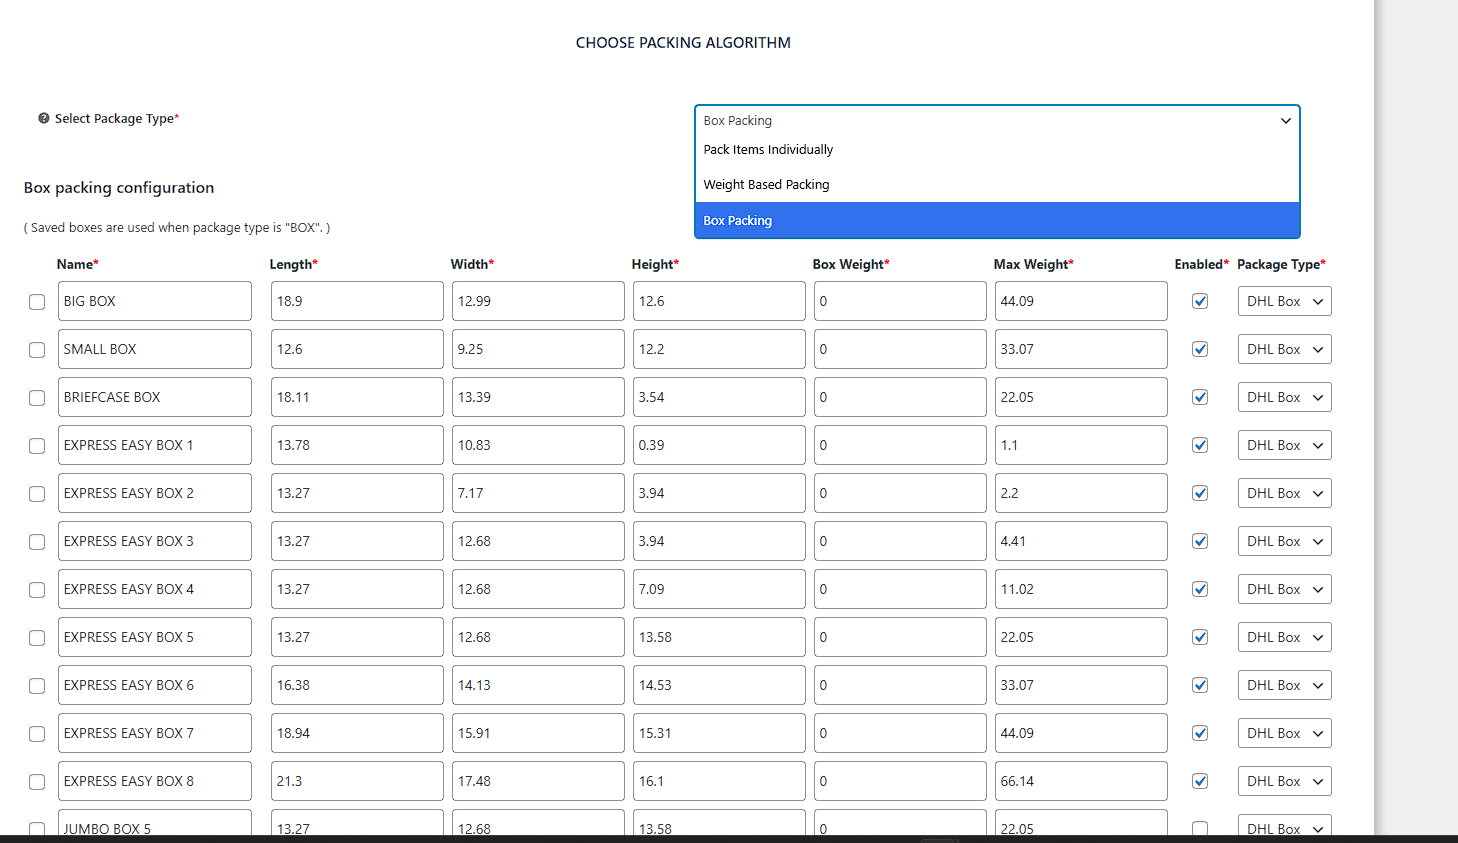
For each box row (e.g., BIG BOX, SMALL BOX, EXPRESS EASY BOX 1, …):
-
[✓] (left checkbox) – Select to enable a specific box size.
-
Name* – Your reference name.
-
Length* / Width* / Height* – Inner dimensions (cm/in based on your unit).
-
Box Weight* – Empty box weight.
-
Max Weight* – Maximum gross weight DHL allows for that box.
-
Enabled* – Toggle to include this box in packing.
-
Package Type* –
DHL BoxorCustom. Choose Custom for your own packaging.
Tip: Start with 2–3 practical box sizes. Too many sizes can make packing unpredictable.
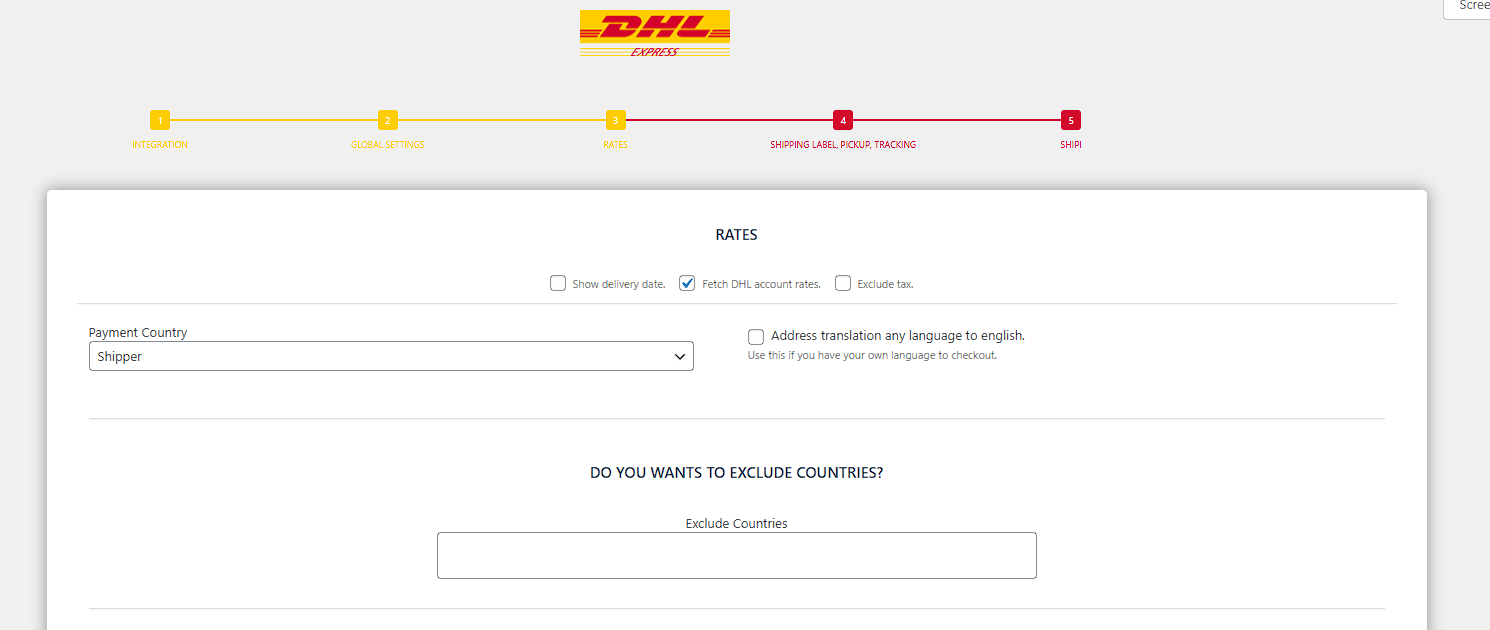
3) Rates
General\
-
Show delivery date
Displays DHL’s estimated delivery date alongside each service when available. -
Fetch DHL account rates
Use your contract (negotiated) rates. Turn off to use public list rates (if allowed by your account). -
Exclude tax
Show freight charges at checkout without tax added by WooCommerce. -
Payment Country
Choose whose country context to apply for certain surcharges/tax behaviors in the rate (usually Shipper). -
Address translation any language to English
Transliterate non‑Latin addresses to English for rating/labels. Useful when your checkout accepts local scripts. -
Exclude Countries
A list field to block specific destination countries from receiving DHL Express options at checkout. Enter country names or ISO codes separated by commas.
Service Selection & Adjustments
Two sections list all Domestic Services (origin and destination in the same country) and International Services. Some names appear more than once because DHL markets similar products with different service codes—select all that apply; the plugin will map by destination.
For each service row:
-
[✓] – Enable/disable the service for checkout.
-
Custom Title (optional) – Override the name shown to customers (e.g., rename EXPRESS WORLDWIDE to DHL Express (2–4 days)).
-
Fixed Adjustment (optional) – Add or subtract a flat amount to the returned rate. Use negative numbers for discounts (e.g.,
-2.50). -
% Adjustment (optional) – Percentage markup/discount (e.g.,
5to add 5%).
Leave adjustment fields blank for pass‑through pricing. Use either fixed or percent, or both.
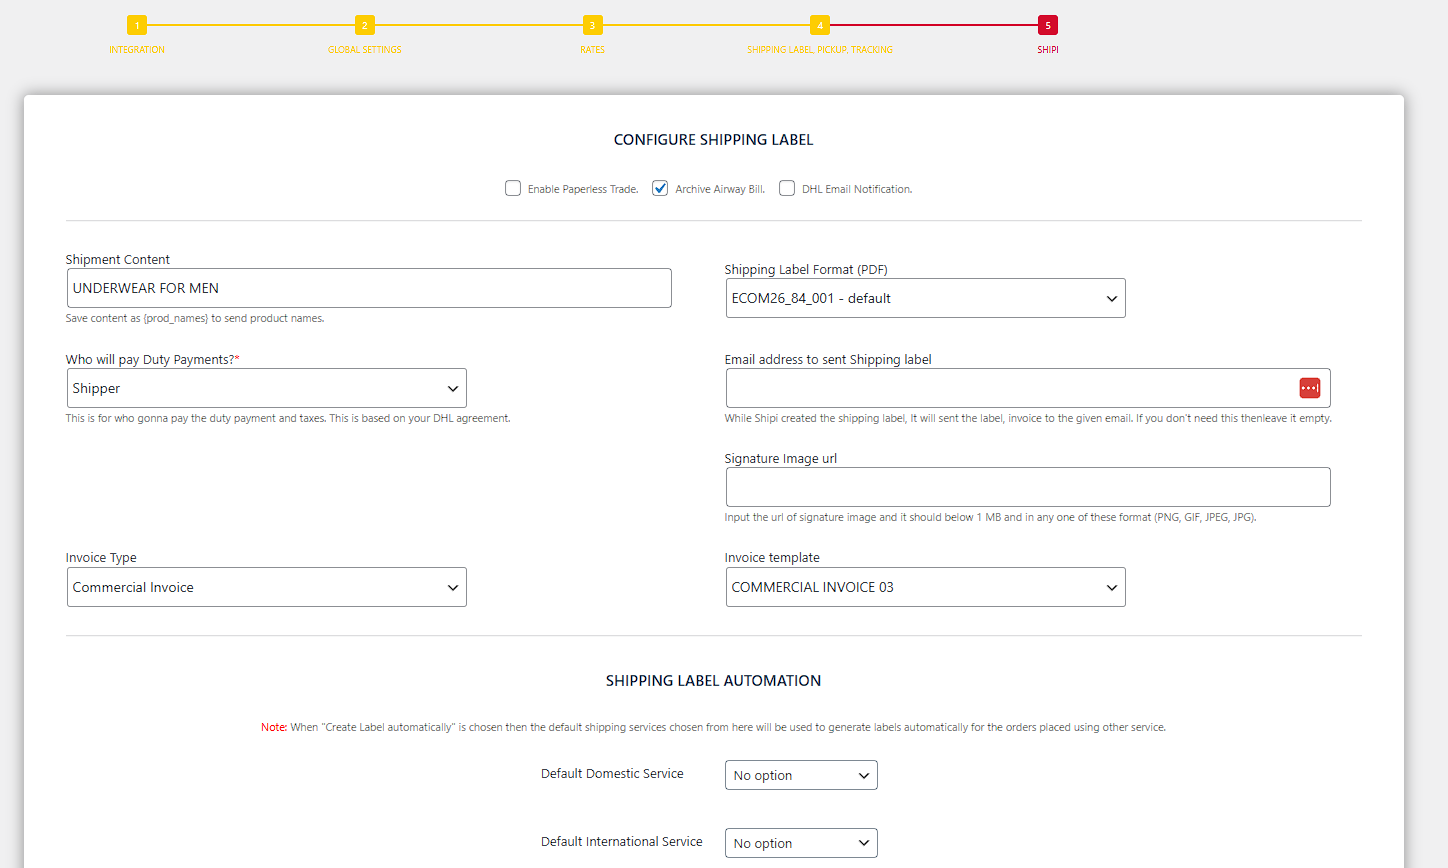
4) Shipping Label, Pickup, Tracking
Configure Shipping Label\
-
Shipment Content
Free‑text description shown on the label/invoice.
Tip: Enter{prod_names}to automatically include ordered product names. -
Shipping Label Format (PDF)
Label template/style returned by DHL (e.g.,ECOM26_84_001 – default). Choose the format that matches your printer (A4 or 4×6 thermal). -
Who will pay Duty Payments?*
Options typically: Shipper, Receiver/Consignee, Third Party. Align with your Incoterms and DHL contract. -
Email address to send Shipping label
When a label is created, Shipi emails the label + invoice to this address. Leave blank to skip emailing. -
Signature Image URL
Public URL to a PNG/JPG/GIF (< 1 MB). Printed on commercial invoice where supported. -
Invoice Type
Choose the document type (e.g., Commercial Invoice). -
Invoice template
Prebuilt layout for commercial invoices (e.g., COMMERCIAL INVOICE 03).
Shipping Label Automation (applies when Create Label automatically is enabled in Step 1)
-
Default Domestic Service
Service used to auto‑create labels for domestic orders if the customer‑chosen service is unavailable. -
Default International Service
Service used to auto‑create labels for international orders if the customer‑chosen service is unavailable.
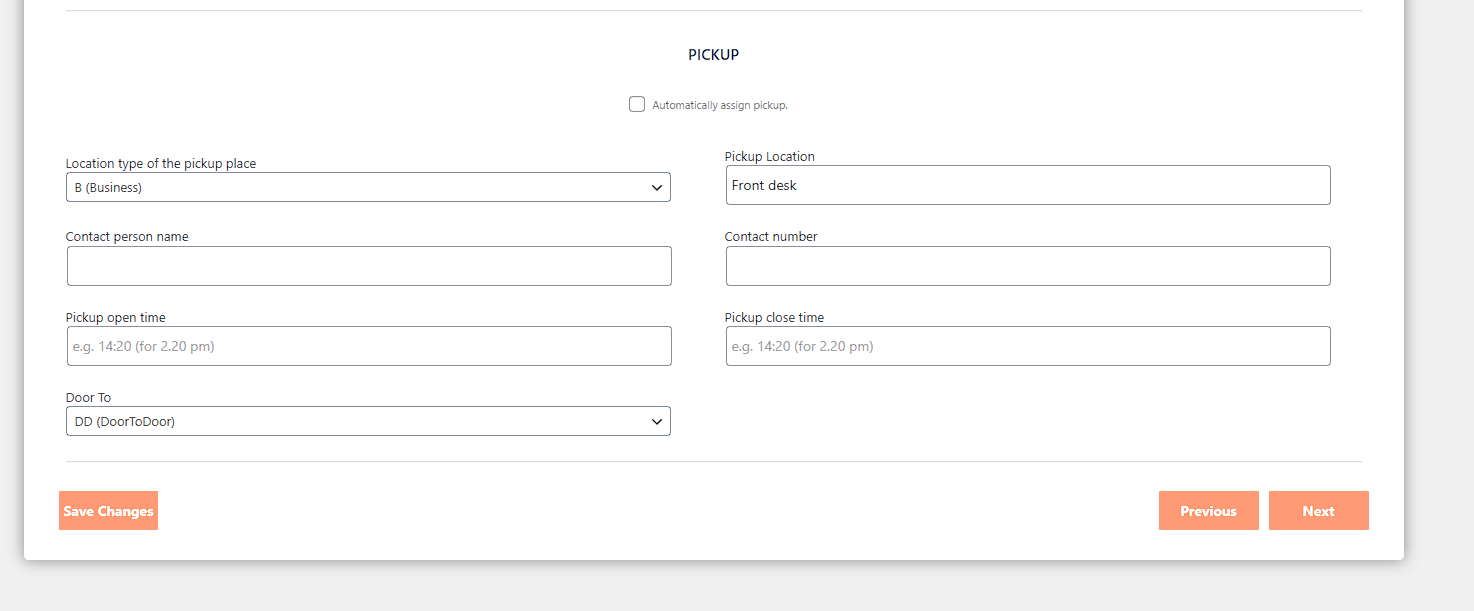
Pickup\
-
Automatically assign pickup
When enabled, the plugin books a pickup with DHL immediately after label creation using the defaults below. -
Location type of the pickup place
e.g., B (Business). Select Residential/Business as applicable. -
Pickup Location
Where the courier should collect (e.g., Front desk, Warehouse Bay 3). -
Contact person name / Contact number
Who the courier should ask for. -
Pickup open time / Pickup close time
Daily time window inHH:MM(24‑hour). Example:09:30/17:30. -
Door To
Delivery terms, e.g., DD (DoorToDoor).
You can still create labels without auto‑pickup and book pickups later from the order screen.
5) Shipi (Linking)
-
Shipi Integration Key
A unique key that securely links your WooCommerce site to the Shipi service responsible for off‑site rating/label processing.-
Edit integration key – Check to reveal the field for rotation or re‑linking.
-
Status text “Site Linked Successfully.” confirms connectivity.
-
Validation & Requirements (common to all steps)
-
Weights & Dimensions are required for accurate rates and for Box Packing. Set them per product/variation in WooCommerce.
-
Phone & Email must be valid to receive pickup/label notifications.
-
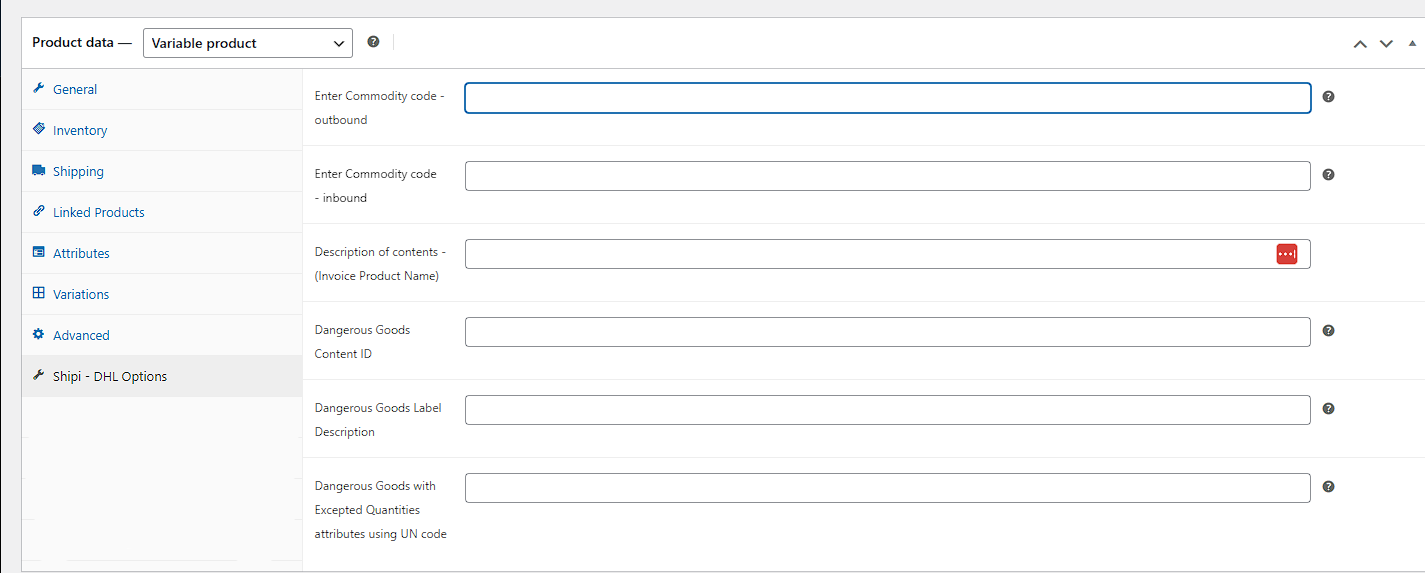
Customs data (HS codes, country of origin, declared values) should be set per product for international labels. This options available inside the product meta fields
Error Messages & How to Resolve
-
“No rates returned” → Verify credentials, origin address, product weights/dimensions, destination service availability, and that Enable Live Shipping Rates is on.
-
“Label creation failed: missing …” → Check required ship‑from fields, service selection, and the chosen packing algorithm (e.g., overweight package vs. Max Weight).
-
If any errors contact support@myshipi.com or submit your ticket on https://app.myshipi.com/support
Start with Our Free Plan
Shipping rates, store integration, and 50 order shipments - yours for a lifetime!
*No credit card required
Create Free Account